
If there is one person on the Internet, that has proven to have quite a lot of knowledge on leathers, it has to be Mike of Indigoshrimp. I know Mike from a long, long correspondence on leather, leather crafts and shoes and I have to say, that I'm constantly impressed by the wealth of his knowledge. This is why, I immediately asked him, if I could re-post his in-depth guide on caring for natural veg tan leather and I got permission to do so and here is the result. If you have any questions on caring for your leathers, please do ask, and I'm sure, that Mike will gladly help answering questions, and I'll do my best to keep up.
Hopefully Mike and I can present some future projects, but there are no deadline and we are both of the idea, that good things can take a very long time.
Revisiting an old topic this time, but less opinion and more practical pointers for newcomers to natural vegetable tanned leathers.
A common question I am often asked is “How do I care for my new leatherxxxxx?”
It is a huge topic due to the many types of leather available which differ in origin, tannage, finishing processes, etc…most of the common stuff, such as chrome-tanned leathers on hand-bags or the re-tanned leathers on men’s shoes aren’t too difficult to care for, and as long as you pay reasonable attention to the maintenance of the leather, it would look more or less the same regardless of the finer points of care – such is modernised leather, an uniform appearance on different hides and at different times
Our focus will be natural vegetable tanned cattlehide here, with most points applicable to natural horsehide too, as this is perhaps the defining leather of our hobby…and the leather on which your method of care produces very visible results.
 |
| ^ Vegetable tanned cattlehide, hand-stuffed, in natural |
 |
| ^ Pure oak-bark tanned cattlehide, in natural |
 |
^ Vegetable tanned horsehide, soft-rolled, in natural
I will say that there is no “correct” way of maintenance, and as such I won’t comment on the frequency of care (which is usually the subject of debate.)
|
There are, however, basic principles which I think folks starting out in this hobby would benefit from.
Firstly, when is the right time to care for your natural veg. tanned leather?
Too often, beginners would care for their veg. tanned leather goods like they’d care for their footwear…this is usually no good.
It is important to keep in mind that vegetable tanned leather that is “unfinished” is not as water resistant as other tannages, loose it’s oil content faster and show the signs of wear and tear more dramatically.
Unlike heavily dyed and coated footwear leathers, you can’t cover-up or polish-over natural veg. tanned leathers – and therefore maintenance at the right time is key for the development and health of the leather.
I would strongly recommend the development of a maintenance schedule; for example, a natural vegetable tanned belt might receive some care for every month of effective wear.
Otherwise, there are a few signs which warns you to imminent and irreversible damage to the leather (usually to the grain and the junction layers), and these should spur you into action!
1. The grain feels dry to the finger tips
2. Superficial cracking or flaking
3. Development of ridging which are not the result of usage creasing
4. The leather has been submerged in, or come into prolonged contact with, water
5. Recent application of cleaning agents such as ethanol, etc
 |
| ^ Magnifier, pig-hair brush, horse oil & neatsfoot/wax mix |
 |
^ Fuller horsehair brush from the (?) 1970s
|
So what do we need for basic maintenance?
There are just a few essential tools, none too expensive:
1. Applicator
2. Brush
3. Cloth
4. Conditioner
The applicator is used for introducing the oil or cream conditioner onto the leather.
When covering larger areas, such as a long strip of belt or a bag, I’d recommend using your thumb, in a circular motion, to work the conditioner into the grain.
Although, believe it or not, the use of your thumbs and fingers actually takes a great deal of practice when it comes to applying pure oils – it is easy for the untrained hand to saturate an area of the leather, causing unnatural looking dark stains to appear.
Thus, use a broad brush (around 3 cm in width) for the application of oils until you get the feel of how veg. tanned leathers react to oils, as they help to distribute the oil more evenly over the grain.
To get to hard to reach places or stitched areas, I would strongly recommend using a smaller brush (around 1 cm in width), preferably one made out of animal hair (which remain soft and pliable.)
The choice of brush also needs consideration – do not use synthetics nor boar bristle brushes for shoe polishing, as vegetable tanned leathers which have just soaked up oils are very susceptible to abrasion.
What you need is a horsehair brush!
A good quality horsehair brush is perhaps the single most worthwhile investment if you plan on using or collecting good quality leather-crafts.
Having a cloth is optional, unless you plan on using a conditioner with a heavy wax base, which I would not recommend for natural veg. tanned leathers.
Look for a fine-fibred cloth which won’t shed all over the leather – keep in mind that wax-based conditioners easily trap dust and fibres until they are polished off or smoothed over.
Purists may disagree, but I find cleaning cloths used for TV screens or computer monitors quite suitable for the job!
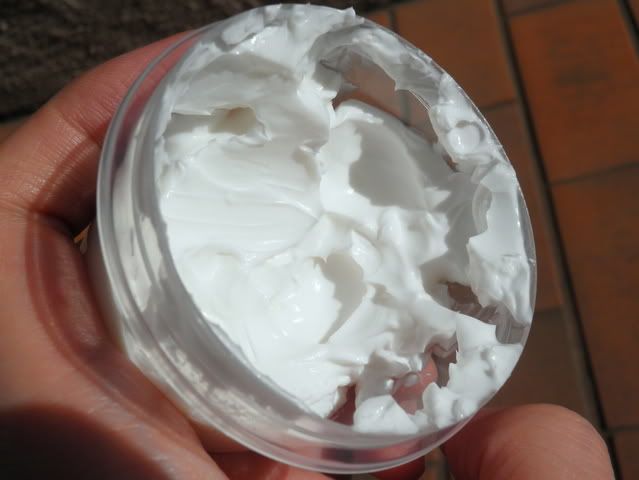
To complete your tool kit, you’ll of course need a leather conditioner.
Leather food is usually either oil-based or wax-based, but most (hopefully) will contain both.
For vegetable tanned leathers, I would recommend a conditioner which contains at least 50% distilled animal oil.
 |
| ^ Pure emu fat |
 |
^ My home-made conditioner
|
Avoid anything with wax as the main ingredient (these aren’t food so much as a protective coating) or anything which calls itself a shoe/boot oil.
Remember that the “food” is the oil, wax serves as a surface dressing which do not usually penetrate very deeply unless heat is applied.
Together with water and some stabilising compounds, the oils and waxes are the essential components.
Read the labels, avoid anything with too much commercial “fillers”.
Further, when it comes to wax, always choose beeswax. Keep in mind that a high wax content or raw beeswax will darken your leather more dramatically, as will the application of heat during the conditioning process.
 |
^ Raw beeswax from a bee farm
|
There is a difference between the darkening with beeswax and the darkening with over-oiling…the former gives you a nice golden or amber hue, the later results in a mottled, dark brown.
I can’t emphasise enough the importance of a good conditioner – don’t cheap out, source it from overseas if you must, or even make your own – the long term health and appearance of your leather depends on it!
Other optional equipment include a magnifier, a burnishing tool made of wood/bone/stone, and a small metal pick (to remove debris from stitch holes and around hardware.)
Altogether, a basic kit might cost you around $50…a very small price to pay if you plan on owning a good collection of leathers.
Once your tools are assembled, you can start the feeding process…
let me share with you some basic maintenance methods.
For simplicity, I like to differentiate between leather cleaning and leather conditioning.
Let’s start with cleaning…
Regular cleaning is essential to the health and appearance of your leather, and at it’s most basic is really a quick & easy process!
Basic cleaning is done fairly regularly – with every wear for items such as shoes, or with every couple of weeks of wear for items such as belts and wallets.
It really is an easy process: simply brush over the item with your horsehair brush, and wipe it down with a damp (not wet) cloth.
 |
^ The leather on footwear is happiest if brushed before and after every wear!
|
The stroke of the brush is firm and smooth – the point is not to polish, but to remove dust & debris. The wiping with the damp cloth, on the other hand, is done very gently to avoid excess moisture soaking into the grain.
Leather soap and similar cleaning agents are used sparingly and only when necessary, keeping in mind that part of wearing natural vegetable tanned leathers involves the leather reacting to stains, dyes, etc. A bit of indigo staining on your wallet or belt doesn’t warrant scrubbing with cleaning agents…being too obsessive-compulsive or having too much of a perfectionist trait will make your life very difficult if you pursue this hobby
With practice, the weekly cleaning of your leathers will take no more than a few minutes!
The feeding of leather, though, is much more time consuming if done properly.
Before any conditioning is to occur, you must first make sure the leather is clean!
This ensures better penetration of nourishing oils, as well as helping to prevent clogging of the pores.
It is preferable if the room temperature (or the leather at least) is relatively warm…this is no problem on a Summer day here in Australia, but use a blow-dryer if the temperature is too low.
If required, gently heat up the leather and/or conditioner with the blow-dryer – be very gentle, and remember the leather just needs to be mildly warm.
Then, using the applicator/brush, gently cover the grain with a small amount of conditioner (no more than a pea sized amount) and quickly smooth it over to cover a larger area; be extra careful when using oils, it is probably a better idea to use a wide brush to begin with, painting very thin layers of oil.
When using a pure oil, caution is needed to prevent saturating a particular area of the leather.
When using a cream or wax-based conditioner, you’ll need to work the conditioner into the leather with your thumb using a firm, circular motion.
For hard to reach areas, or where there is stitching/hardware, you’ll need to use a small brush to apply the conditioner and a small metal pick to remove clogged or excess conditioner if necessary.
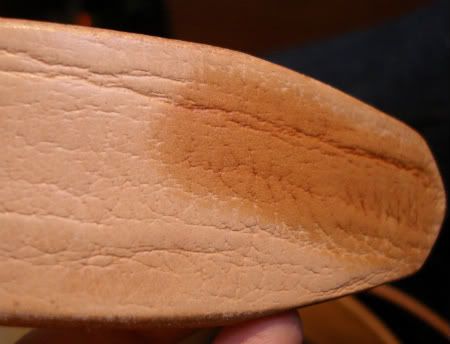 |
| ^ Temporary darkening with the application of oil |
Don’t be alarmed if you notice the conditioned areas of the leather becoming darker…this is only a temporary effect which disappears as the oils sink deeper down into the leather.
If the leather is very thick (e.g. on a 15 oz belt) you may need to apply the feeding process to the back-side of the leather as well – though I find this is generally not required after the first feeding unless you’ve neglected the leather for a long period of time.
Of course, the coating of veg. tanned leathers for use in inclement weather or rough-handling is a whole other topic unto itself, but this is more esoteric than practical nowadays.
This is more or less covers the basics of care. There’s no big secret to great looking natural vegetable tanned leather goods - enjoy using & wearing your leathers, take care of them properly, and they will serve you well for years to come, not to mention the develop beautiful patinas along the way.
Keeping vegetable tanned leathers really is a fantastic little hobby, and makes for a very nice side-project as you break in your denims and ducks. I’d strongly recommend every denim-nerd to give it a go.
No comments:
Post a Comment